
Tales of Arise Beginner's Guide | Gameplay Tips & Tricks
Here's are a few tips and tricks on how to play Tales of Arise.
Game Guide by Mash Rahman on May 30, 2026
The opening hours of Tales of Arise are ridiculously overwhelming, with a boatload of mechanics thrown your way from the get-go. Whereas older games in the series eased you into their combat systems, this game demands you have a fundamental grasp of its core rules pretty much right away. This guide aims to distill those complex systems into actionable advice so that you may navigate the harsh realities of the Dahnan rebellion.
The Basis of Action Combat
Combat in this game is a fast-paced dance where you need to be aware of your positioning and your available resources at all times. Your main offensive tool is the Artes Gauge, a segmented blue bar that tells you exactly how many special attacks you can link together. You can’t just button-mash your way through fights, because running down this gauge leaves you temporarily vulnerable and unable to extend your combo strings.
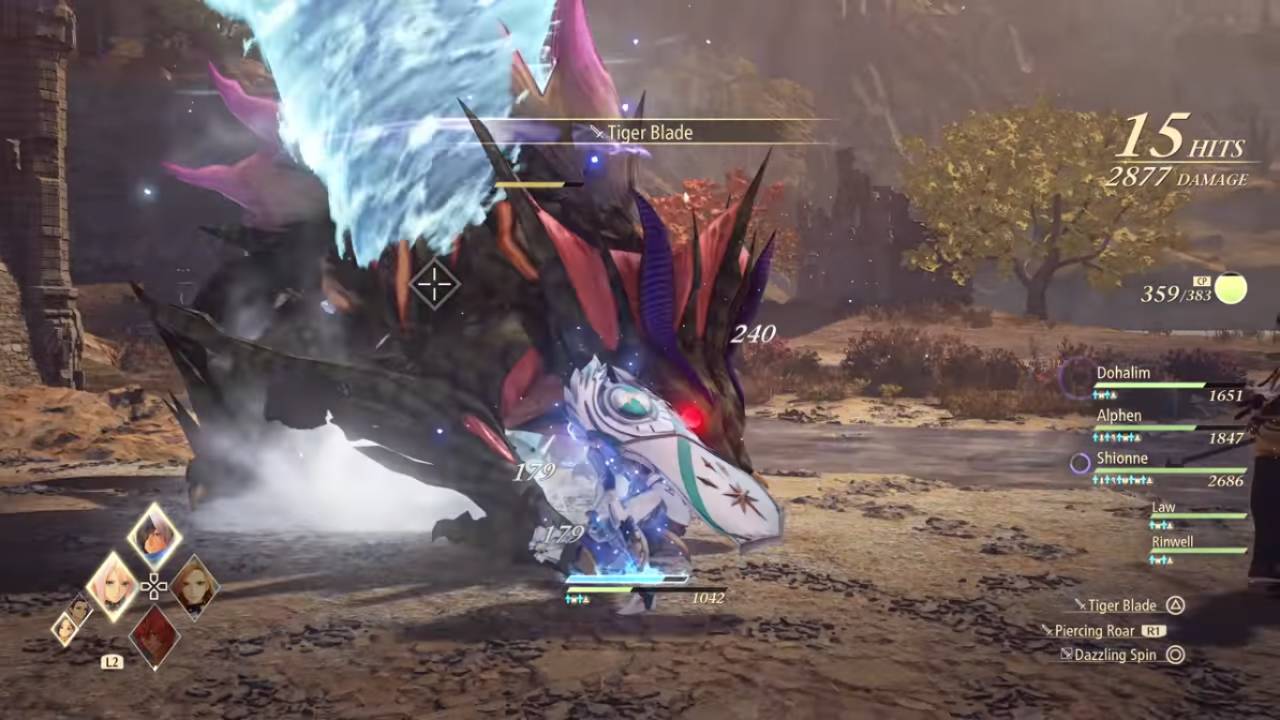
You do not want to go all in and burn through the whole gauge at once, so you need to learn the rhythm of engaging and disengaging with the enemy. After a short burst of martial artes, consider stepping back from your target, or performing a few normal, non-magical attacks. This brief pause allows your Artes Gauge to refill naturally, so you always have the energy needed to respond to sudden dangers, or take advantage of a stunned foe.
How to Dodge Like a Pro
But just as important as your offensive output is your defensive maneuvering, especially getting the perfect dodge mechanic right. You’ll often see a visual flash or hear a certain sound from your party members when an enemy is about to make a big attack. If you hit the evade button exactly when something hits you, your character will flash blue and slow down the action on the screen for a moment.
This perfect dodge nullifies all incoming damage and immediately allows you to make a strong counter-edge attack. This particular counter move not only does a good chunk of damage, but it also teleports your character right to the enemy so you can restart your offensive combo without missing a beat. The most important step to mastering the battlefield is to train yourself to watch for enemy attack patterns, not just to stare at your own character’s animations.
How to Manage Your Cure Points
For veteran RPG fans, perhaps the most jarring mechanical change will be the addition of Cure Points, or CP as they’re usually known. Instead of each character having their own magic points to cast healing spells, the whole party has a single communal CP pool. When Shionne or Dohalim heals, cures status effects, or revives a downed teammate, your total CP pool goes down.
This communal resource management is key to changing how you approach long dungeon exploration segments. If you’re taking unnecessary damage in minor skirmishes, your AI companions will quickly drain your CP pool to keep you healed as much as possible. Basically, going into a major boss fight with 0 Cure Points is a death sentence, since you won’t have any way to recover health with magic.
To counteract this constant drain, you must carry a healthy supply of orange gels, the only consumable items that can restore CP while in the field. These particular gels are very expensive from local vendors early on, so only use them if it's an absolute emergency. Instead, use a LOT of the cheaper Apple Gels and Peach Gels to heal light wounds from your inventory, and save your precious CP for resurrections in the heat of battle.
Misusing Character Boost Attacks
As you progress through the opening chapters, you'll quickly realize that normal attacks won't cut it when it comes to taking down the larger, heavily armored zeugles that roam the map. Here is where your party’s unique Boost Attacks become absolutely essential to your overall survival. Each member of your party has a custom counter-ability that activates immediately and is mapped to your directional pad.
These are not merely additional sources of damage; they are intended to violently interrupt specific enemy behaviors. If you're up against a heavily armored beast that is deflecting your physical attacks, calling Law will break their guard immediately and leave them open for a full combo. If there’s an enemy spellcaster in the middle of casting a huge area-of-effect spell, Rinwell can immediately steal their magic and stop the cast altogether.
You have to quickly identify which enemy types are spawning in the arena because you need to call upon the exact character you need in the heat of battle. The right Boost Attack will instantly knock the target down, interrupting their attack animations and creating a massive window of opportunity for your party. Shionne is important for knocking air enemies to the ground, and Kisara can halt charging beasts in their tracks thanks to her large shield.
Usage of Cinematic Boost Strike
The diamond-shaped Boost Strike gauge in the enemy interface fills up quickly by striking specific counters rapidly and attacking the enemy's weak points relentlessly. When this blue diamond is full, any two characters can combine for a devastating, highly cinematic finishing move. These Boost Strikes are almost instant kills on normal enemies and do huge chunking damage on big bosses.
Always make sure you're using elemental weaknesses and getting your Boost Attacks in to activate those movie finishes as much as possible. They’re not only your best way of clearing out a crowded arena, but the animation gives your party temporary invincibility frames. You can time a Boost Strike to start when a boss is casting a big area attack and avoid the incoming damage altogether, without having to nail the timing of a dodge.
Managing the AI
If you leave your companion AI on default settings, that's the quickest way to drain your CP pool and find yourself utterly stranded in a dungeon. The default strategy menus are ridiculously aggressive, forcing your healers to be constantly casting expensive spells to repair the smallest of scratches. The strategy menu is something you need to spend time digging into, and it can totally change how your party acts when you are not directly controlling them.
Make a custom strategy that explicitly tells your healers to use their healing magic only if an ally drops below fifty percent of their maximum health. Also tell them to use basic healing items instead of magic if your CP pool drops below a certain danger threshold. You also want to make sure that you manually turn off any artes that will drain their health too much for the AI characters in the artes menu.
.jpg)
Alphen has some serious flaming edge attacks that actually eat into his own health bar, dealing massive physical damage. If you allow the AI to freely use these moves, Alphen will be constantly putting himself in mortal danger, forcing your healers to drain your CP to save him. These specific artes are turned off so that your AI-controlled allies are worried about staying alive instead of doing flashy, self-destructive damage.
Unlocking Skill Points and Titles
Leveling up in this game is so much more than just leveling up and adding more health to your base health pool. Most of your new combat skills and huge passive buffs are all locked up behind the giant Title system. You naturally acquire new Titles for your characters as you complete optional side quests, cook specific meals, reach relationship milestones, or perform certain combat maneuvers a specific number of times.
Each Title has a small skill tree panel with five different upgrades that you have to buy with Skill Points that you earn from normal combat. When deciding where to spend your hard-earned points, you should heavily favor utility over raw physical damage. Always unlock nodes that increase max Artes Gauge, give you passives that conserve CP, or let you dodge in the air during combat.
In addition, fully completing a Title panel (by purchasing all five of its nodes) gives a permanent, very substantial completion bonus. That particular bonus greatly increases that character's total combat effectiveness and should always be your highest priority when spending points. It is always far better to fully complete a single Title panel than to randomly spread your skill points across several incomplete trees.
Preparation for cooking and campfire
Glowing campfires are scattered throughout the various beautiful biomes of Dahna and are safe havens for your weary traveling party. These camps fully restore your health and your Cure Points for free, making them critical checkpoints during long dungeon dives. The real power of the campfire, though, is in the game’s robust cooking system, and you should use it every single time you decide to rest.
You will naturally harvest ingredients like wheat, meat, and different kinds of vegetables from shiny resource nodes while exploring the world. Mix these items at a campfire to prepare special meals that provide your whole party with major passive buffs for a set amount of time. These temporary buffs can range from simple boosts to attack and defense to massive boosts to experience point yields.
Always eat according to your current goal for optimal gameplay efficiency. If you’re fighting a boss that heavily employs elemental magic, make a meal that increases your elemental defense stats in particular. If you plan to spend the next hour grinding for skill points, always eat a meal that increases your battle chain multiplier or overall experience gain to make your time much more rewarding.
Accessories & Equipment Forging
Of course, discovering new weapons and armor in hidden treasure chests will increase your raw statistics, but the true depth of character customization comes from crafting accessories. While exploring the open zones, you will often find mining points that contain various kinds of raw, unrefined ores. These ores can be taken to an engraver in any large town, and very specific accessories can be forged to suit your play style.
Each ore has its own innate base stat, like increased attack power or slightly lowered casting time. But rarer ores also have random passive skills on them, like resistance to certain status ailments or bonus damage vs certain enemy types. Throughout the story, as you level up your engraving shop naturally, you will unlock the ability to manually transfer these random passive skills between different accessories.
This transfer system allows you to create highly tailored equipment for each party member. You can easily make an accessory for Rinwell that greatly cuts down on her casting time and boosts her magic penetration, turning her into a full-blown artillery cannon. Perhaps the most important part of surviving the brutally difficult late-game spikes is taking the time to learn and exploit the accessory crafting system.
.jpg)
Maximize the Battle Chain
When you inevitably find yourself slightly under-leveled for an upcoming story encounter, you'll need to do some serious grinding. To make this tedious process as efficient as possible, you need to actively exploit the Battle Chain gauge on the right side of your screen. You can build up a really lucrative multiplier slowly by aggressively doing back-to-back enemy encounters without resting or fast traveling.
As this particular gauge fills, the amount of experience points, skill points, and rare item drops you get at the end of a battle increases exponentially. Eat a food that boosts your experience yield right before you begin your combat streak to get the absolute most out of this system. Find an area of the map with a lot of zeugles and kill them in quick succession without stopping to collect resources.
If you’re able to keep the Battle Chain gauge completely full, you’ll often trigger the appearance of rare, glowing enemy variants that offer massive rewards upon defeat. This high multiplier is the most efficient way to quickly raise your party’s power level. Just keep a close eye on your CP pool though, because if you push your luck too far with a full Battle Chain you can easily find yourself in a devastating game over if you run out of healing magic.
Handling the In-Game Economy
Money, or Gald as it’s known in the Tales universe, is surprisingly hard to come by during the first half of the adventure. Unlike most traditional role-playing games, you won’t get currency for taking down regular monsters in the wild. Instead, your main source of income comes from actively selling the crafting materials and specific commodity items that drop from monsters.
Be sure to visit the merchants in each town and camp to unload these valuable commodities. Good thing the game helpfully flags items that are only meant for selling, so you won't accidentally vendor a rare weapon forging material. The only reliable way to afford weapon upgrades and emergency healing gels is to stay on top of your inventory management and sell your excess monster drops.
Finally, keep an eye out at all times for Dahnan Owls secreted throughout the various environments and towns. Collecting these cute mascot characters will unlock unique cosmetic items for your party and also unlock a special sanctuary later in the game. Spending time thoroughly checking out all the nooks and crannies for owls and hidden treasure chests will give you a massive structural advantage as the story constantly builds in intensity.
Check out our Tales of ARISE - Beyond the Dawn Edition Review and other guides:
- Tales of Arise Guide | Unlock the Billowing Cyclone Trophy
- Tales of Arise Guide | Basic Combat Mechanics
- Tales of Arise Guide | All Recipe Locations
- Tales of Arise Guide | All Fishing Spots and Fish Locations
- Tales of Arise Guide | All the Locations of the Artifacts
- Tales of Arise Guide | All Astral Flower Locations
- Tales of Arise Guide | Unlock the Big Game Hunter Trophy
- Tales of Arise Guide | Unlock the Wall Smasher Trophy
- Tales of Arise Guide | Unlock the Raging Current Trophy
- Tales of Arise Guide | Unlock the Night Blossom Trophy
- Tales of Arise Guide | Unlock the Veteran Rancher Trophy
- Tales of Arise Guide | Get the Diligent Counterattacker Trophy
- Tales of Arise Guide | Unlock Putting the Past in Its Place Trophy
- Tales of Arise Guide | Conquering the Ultimate Group Training
- Tales of Arise Guide | Ultimate Level 100 XP Farming Strategy
- Tales of Arise Guide | All Dahnan Owl Locations
Editor, NoobFeed
Latest Articles
No Data.